managed dns service hosting user and administrator manual
INTRODUCTION
This is the user and administration guide for the edgedirector.com managed dns hosting service. Most of the operations described in this handbook are performed from within the private areas of the site.
dns failover and hot standby server configuration example
global server load balancing example
load balance and failover example
QUICKSTART
Simple Account Setup Sequence
There are only 3 steps to a default managed dns setup.
- account signup
- email confirmation
- dns setup
Multiuser/Multisite Account Setup Sequence
There are two additional steps in a multiuser/multisite setup. It is recommended that these be performed in the listed order.
- account signup
- email confirmation
- user setup
- user confirmation
- dns setup
DNS ZONE MANAGEMENT
All dns management tasks start at the dns management page after clicking on the dns management menu item to access the dns management start page.

To add a new domain, click on the domain link as illustrated above.
For new accounts, it will be the only link appearing on the page because no domains are attached to the dns service subscriber account.
A blank zone addition input form will be shown in the browser.
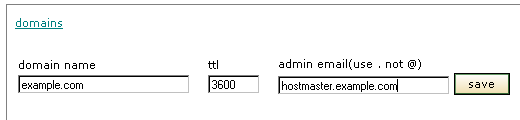
The zone addition input form above has been filled out with the information for example.com as an example of suitable values. The three required values are the dns zone name, the default time to live(ttl) in seconds, and the administrator contact address. Note that the contact address does not use the "@" sign. Instead, it is replaced with a period. Save the information to the database using the [save] button. The dns management start page will now contain the zone as a valid selection for further management tasks.
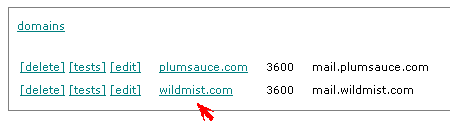
For existing dns zones:
- To delete all zone records, click on the [delete] link.
- To manage health monitors for hosts listed in a dns zone, click on the [tests] link.
- To edit the top level information for a dns zone, click on the [edit] link.
DNS RECORD MANAGEMENT
Managing the individual records in a dns zone starts by selecting a dns zone by name as described above. This action will display a page similar to the one shown below.
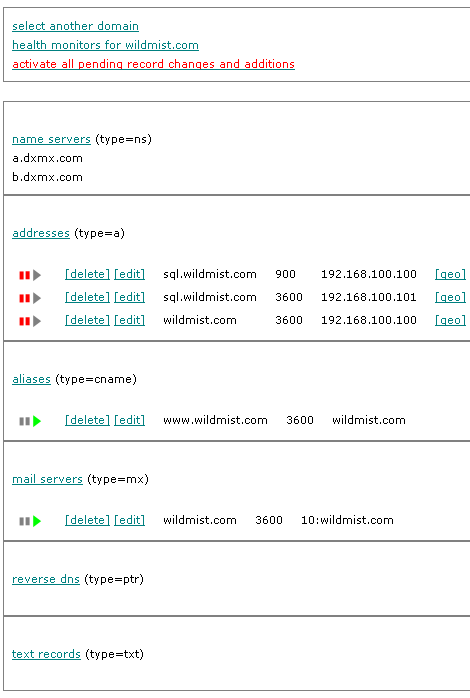
The page is divided into sections by type of record. The name server section is informational only as the name servers are outside of customer dns zones.
The remaining sections are used by clients or technical staff to add, edit and delete records as required. The section headings are clickable links that will add new records of the specified type to the dns zone. If the [edit] link is clicked for a record, it will open the same form as used for new additions with the existing values filled in. Each form has slightly different information requirements to suit the type of record being added or edited. There are hints on each form to help less experienced users.
All additions and changes are saved to the database immediately. But, changes will not be made publicly available until activated using the activate link in red text at the top of the page.
The led icons are used for pausing and unpausing the delivery of dns information about a particular host address. Administrators may use this capability to take servers online and offline without disturbing the availability of services to users if they have multiple servers.
The [geo] link is used to access the geolocation and geoip load balancing features of the managed dns service. This feature requires that multiple records be defined for the same dns name. The dns servers will respond with the correct dns record based upon dns query source location and server availability within the geo-server group.
MONITORING MANAGEMENT
Managed dns service from edgedirector.com include a server health monitoring component. The monitoring component gathers server responses from the individual servers and adjusts the dns responses given to the public as required. The dns administrator can choose whether a failed server is automatically included in dns responses after recovery is detected or if inclusion in dns responses must be manually initiated. Manual initiation might be required in circumstances where the administrator requires an opportunity to synchronise data with the remaining servers before bringing a server back online.
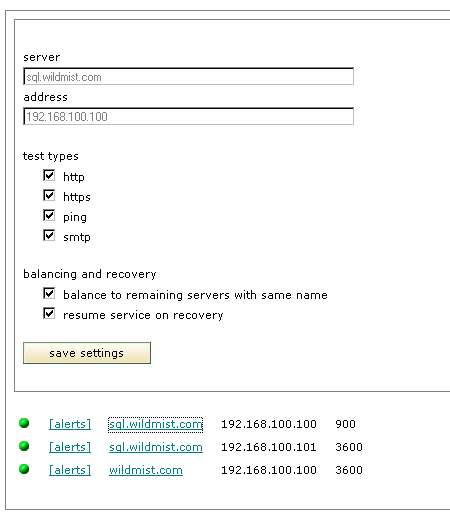
The dns administrator can select any combination of tests that is suitable for the server being monitored. The test period is bounded at the maximum and minimum as a percentage of the specified ttl of the server. These bounds are selected to optimise the perceived availability of services by users based upon the ability to replace cached dns information.
GEOGRAPHIC DNS RESPONSE MANAGEMENT
The geoip/geolocation component of the managed dns service can be used by administrators to determine which servers will be responsible for servicing requests from around the world.
The geo capability can be used to achieve a variety of goals. It can be used to reduce response time by pointing users to the nearest server. It can be used to return customised content to users by pointing them to a geographically designated server. In combination with designated servers with redirects, it can be used to move traffic to selected partners. Careful selection of coverage areas will ensure that services are always available to the global community without interruption even if the designated server(s) are temporarily available.
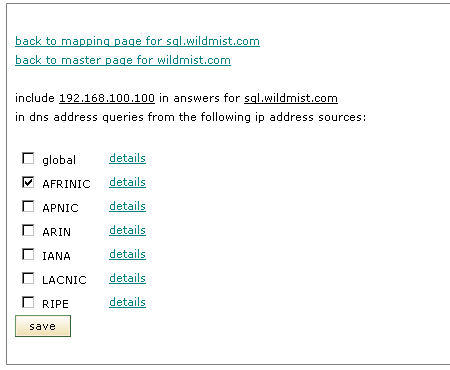
The example above shows the selection at the highest level to make the image shorter on this page. Clicking details will let the administrator control the responses at the country, regional or city levels. Any server can be included in the response set for any number of geographic locations. In this case, the server is only included in responses for requests originating from the AFRINIC assigned ip address space. For many situations, grouping by registry level is adequate because it is effectively the same as grouping by continent.
ADMINISTRATION TASKS
User Management
Administrators can add users to their accounts using the add new report and alert recipients link of the user management screen.
You will be prompted to input the email account of the new user.
A confirmation message will be displayed informing you that the confirmation email has been sent to the designated user.
The new user will receive an email asking for confirmation of the email address and acceptance of an account. The user will be activated once the link in the email has been clicked by the recipient. This procedure ensures that all user accounts are created correctly and accepted explicitly by the new user.
It is recommended that users be created before creating the site monitors that they will included in.
Email and Account Removal
All users are able to independently deactivate the sending of emails to their email address by using the email removal page.
All request are confirmed through an automated validation link to avoid fraudulent account changes.
In the case of an administrator, deactivating the default email address will close the account completely.
Changes to the administrator account without closing the account are performed through the change email or password page.
Alert Management
All default user email accounts are the default alert destination for their activated server monitors.
All registered users may have additional alerts assigned to their user account by the administrator.
The add new alert destination link is available for this purpose.
The values that may be set for any alert destination are:
- an alert nickname
- the type of alert device
- the alert device address.
- the delay in minutes before sending the initial alert
- the repeat interval in minutes
These parameters allow the administrator to design the most suitable alert plan for their circumstances. Note that alerts are automatically cancelled when a failure is remedied. The failure will still be included as part of the daily reports.
If a particular alert destination is not to be alerted unless a problem is persistent, then set the initial alert delay to the number of minutes which the problem may be considered transient. The value must be greater than the testing interval of 15 minutes.
It is recommended that alerts be created before creating the site monitors that will target them.
A simple example of a multi-alert, multi-party alert plan would be:
- immediate alert to administrator default alert destination
- immediate alert to administrator backup alert destination
- alert to administrator sms text device
- alert to backup administrator default destination
- alert to backup administrator sms text device
- alert to management team default alert destinations
- alert to management team sms text devices
Larger organisations with more reporting levels often use escalation plans similar to the plan above. The difference lies in the number of alerts at each level, the number of levels of escalation and the timing of the alerts.
Private Monitor Management
Private monitors specify the private sites monitored under the administrator account on the private monitors page.
Use the add new monitoring test to add a monitor.
You will be prompted to specify a nickname for the test and the base url for the test.
The base url determines the port and protocol used for the test.
The administrator default email address will be selected automatically as an alert destination. In addition, all available alert destinations will be shown as possible alert recipients and may be activated by using the checkboxes.
By default, the test is designated active at the time of creation. After creating a test, the first test probe should occur in the next fifteen minutes.
If new users or alerts are added later, the test specification can be updated to include them as recipients of reports and alerts. Users will only receive reports or alerts for sites that they have been activated for by the administrator.
Monitors may be activated or deactivated by using the ACTIVE/INACTIVE checkbox at any time.
USER ACCESS
Browser Requirements
The administration site requires javascript and session
cookies to be enabled on your browser. Many
users can use the site without any changes to their
browser settings. If you do not normally have these
turned on, you can limit these features to this site
by using the customisation features of your browser.
The login page will warn you if these features are not
detected during login.
User Security
The basis of the security features built into the
system is the session cookie created when the
user logs in. The session cookie will continue to
exist until either the browser is completely closed
down or the user explicitly logs out. If the user
only closes the particular browser window, the session
cookie will remain available to anyone using the browser.
While it may be acceptable for the user to only close the window in a trusted environment, it is absolutely necessary to log out explicitly when using the system in an insecure environment such as an internet cafe. Also remember to clear the browser cache when in an insecure environment.
User Login
To login, a user should click on the user login link
available from the menu.. Attempts to access any protected
area of the site while not logged in will be redirected
to the login page.
User Logout
To logout a user should use the logout selection in the
main menu.
User Lockout
Automatic system access protection has been implemented
to prevent password guessing. Any user who fails to
login correctly within three attempts will be refused
further login attempts for a period of sixty minutes.
The user account is automatically enabled again after the delay period and the user will be able to login again if the proper credentials are supplied. There is no need to contact support for manual intervention. The procedure is entirely automatic.
There is no feedback to the user as to which element of the supplied credentials are incorrect or invalid. This design discourages casual account probing and dictionary attacks.
Password Recovery
If a user forgets their password, the user can request
a password reminder be sent by email to their email
account by supplying the registered email account.
A reminder will only be sent if the account exists on the system. To avoid account probing, there is no indication to a user whether the account exists or not. These reminders are created automatically by the system and sent immediately.
If a user account needs to be completely reset because the user has lost access to the email account, it will be done only upon proof of authority that is acceptable to the system administrators.
This method of recovery is considered to be an exceptional circumstance and will be subject to significant delay due to the nature of the request.
Login Information
Any user can change their email address and password
using this menu selection. When changes are made,
they are recorded by the system as pending changes and
one or more confirmation emails are sent by the system.
The changes become effective when confirmed by following
the instructions contained in the email.
A password change will only require one email. An email address change will result in two emails. A warning email is sent to the old email address with instructions on preventing an unauthorised change. A confirmation email is sent to the new email address with instructions on confirming the new email address.
These measures protect the accounts from unauthorised changes by requiring the party requesting the change to prove access to the email accounts and that the new email address is valid.
ACCOUNT INFORMATION
Account information is entirely optional. If it is left blank, the account management page will not have any details to display to the user. The account management page permits the editing of account information and the addition of sites associated with the account.
AGENT IDENTIFICATION
Page requests from testing activity in site logs can be identified by two means. The user agent is identified as: Mozilla/4.0 (compatible; MSIE 6.0 Windows 2000; http://edgedirector.com/). The referer is sent as: http://edgedirector.com/. Cookies are not sent. Page requests will not appear in web analytics reports that depend on javascript or beacon images because the images are not requested and javascript is not processed during testing.
source: edgedirector.com
account signup
pricing
bonus credits
user manual
faqs
reading room
news
contacts
terms

distributed server monitoring
exactstate.com
microsoft platform specialists
platformlabs.com
disaster recovery sites
edgeplex.com
web site spell check
accuratespelling.com
copyright © 2007 - 2014
all rights reserved